Showing posts with label reveal. Show all posts

Sunday, 5 June 2016

Scout Reveal

hello everyone, this month i am blessed to receive a package from studio calico to contribute to their june kit reveal - scout! this year, i am contributing to their stationery kit team and have been creating cards with the add on stamps and paper pad. it's been fun making these cards and i am happy to have some ready hand made cards to give out whenever i need to. this month, i got to play with this super cute bugs stamp set designed by jasmine jones! 


i have to admit that the first time i saw this stamp set, i was rather worried. i am terrified of bugs, yes, even the little bugs scare me, so was afraid that i would have difficulty coming up with cards with bugs on them. however, as i am making my first card, i know my worries are unfounded. these bugs are nothing but cute! 

here's a look at what i made!

sorry you've caught a bug
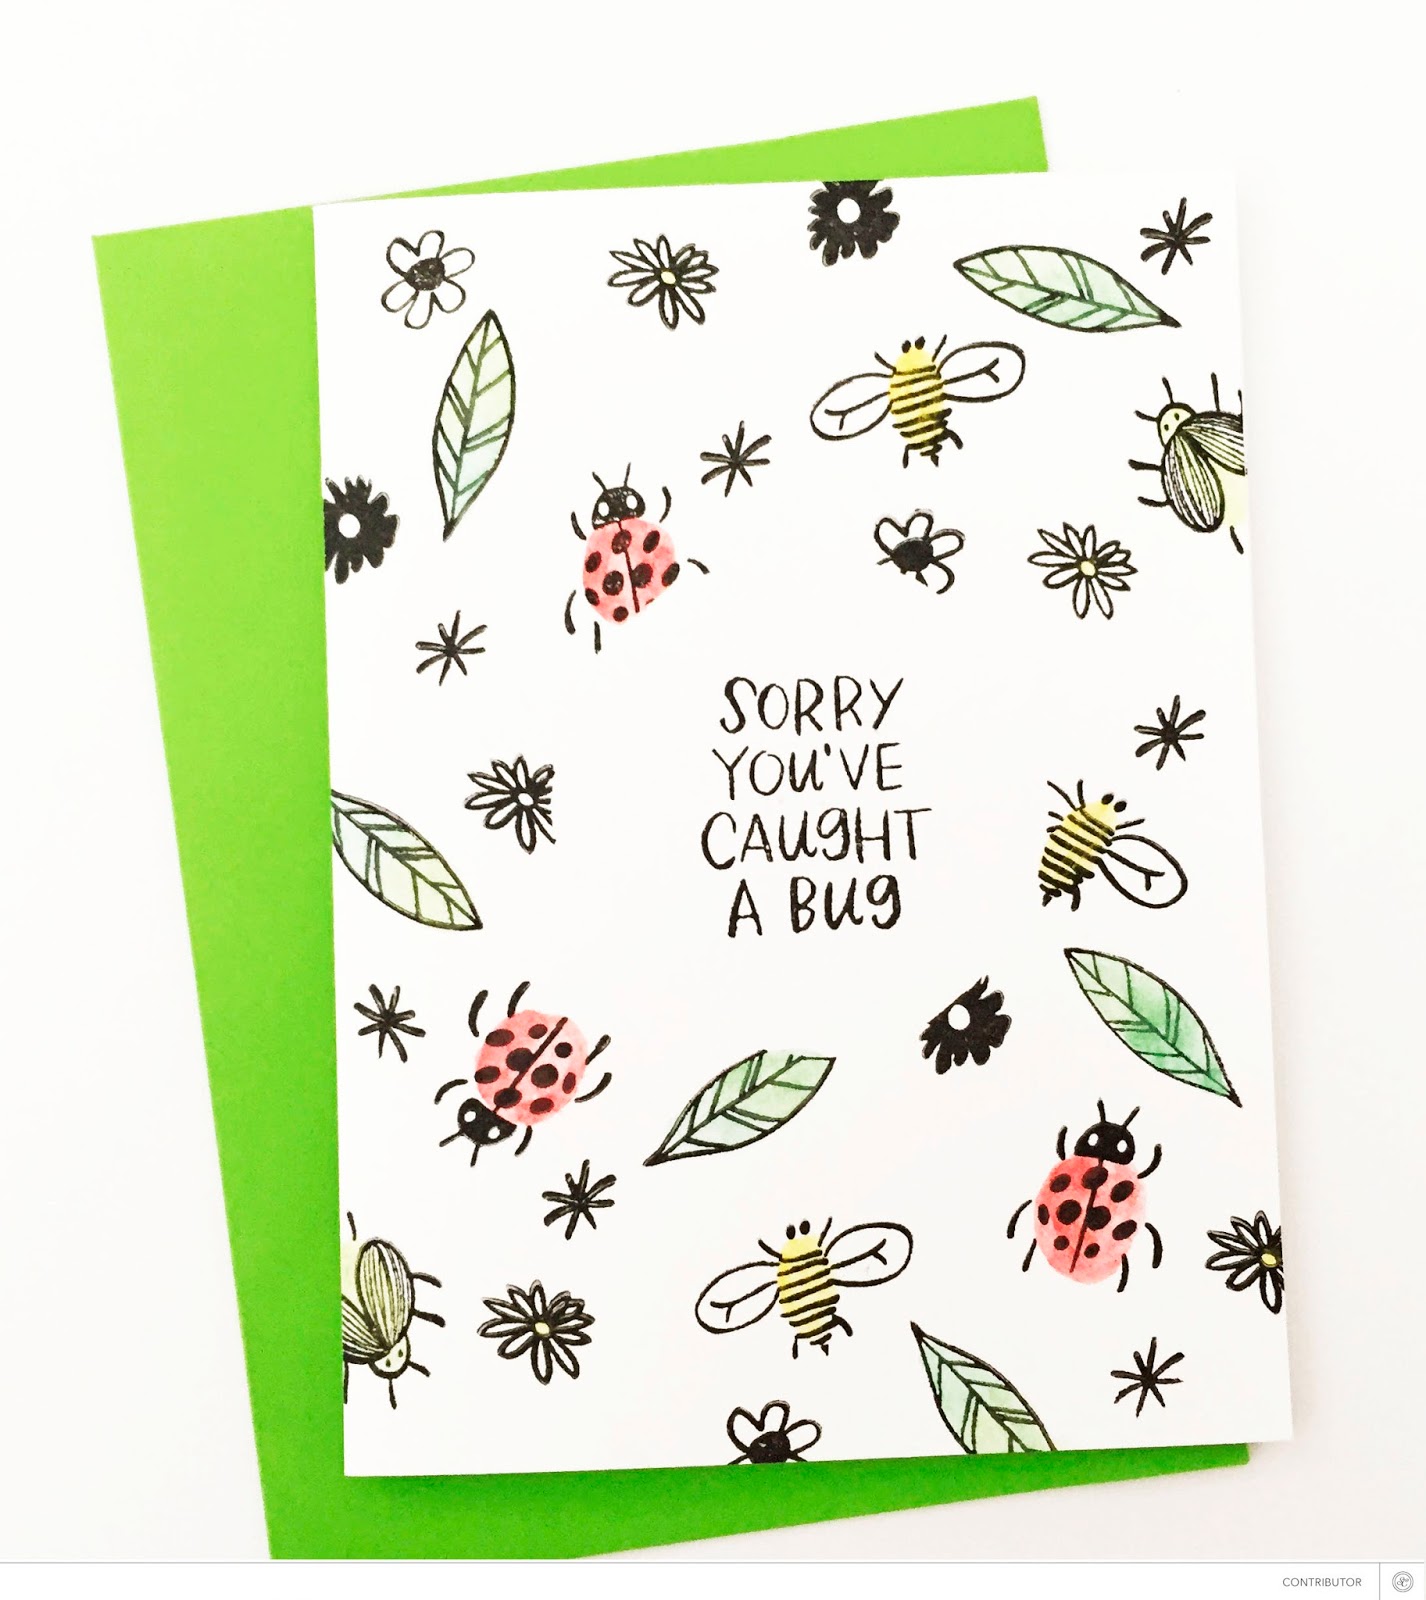


i stamped the bugs, leaves and floral all around with black in and added some colours to this card with watercolours.


and this is the back of my card, how cute this little snail!


bzz...


this is the second card i made. i stamped the bee in yellow and the outline of the bee in black. then i added the bee tracks and bzz...
and the bee tracks are just calling for me to sew on them, and so i did... to finish off the card, i drew a border around the card for added interest.


to cover the thread and the sewing on the back of the card, i just used a piece of paper from the june paper pad, cut it to size and adhere it to the inside of the card. 


i love you


this card is inspired by one of the cards from the bug specialty set by jasmine jones. i love how the bug was made to look like a heart! genius! hence, i decided to make my version of it. i selected the paper from the june paper pad and fussy cut the letters to make i and you. i adhered them on the card leaving a space for the bug heart. i stamped the bug in black ink and coloured it with watercolours. at this point, the card still seems a bit plain to me so i added a strip of the colourful paper as a border. 

and that's it! the 3 cards i made. there are just so many designs you can come up with, i still have a couple in my head... and before i go, thank you so much for dropping by and reading my blog today even though i have not been updating this space for the longest time... i still got some stuff i want to share here, so do check back soon!

xoxo 
lilin

Monday, 2 November 2015

Canyonlands Reveal

hello again! today i'm here to share some of the projects i made with studio calico november kits - canyonlands!

this month, i am excited to work with the main scrapbook kit, big spring add on,  redstone embellishment kit... and these are what i made with them...

happy little moments
(main kit only)


i love every single one of the papers in the main kit so i cut them all up to make the title for this layout! for added interest, i hand stitched on the letters after i adhere them. this is also one of the rare times i am using a patterned paper as my background because this one is too pretty to pass! 

jolly! it's your first christmas!
(big spring add on)


i am in love with the amazing background cut file designed by paige evans this month. i cut it out with my silhouette and decided to use it as a stencil. i applied white gesso over the stencil and i got this beautiful textured background paper. i use white gesso over the white card stock as i love the white on white effect that is so subtle yet textured. i got a tutorial of this page on the studio calico blog, you can check it out here.


*****************

i am a lucky girl this month as i am also given the opportunity to work the lovely add on stamps for the stationery kit! i'm so glad as this made me get started with making christmas cards (i know it's still quite early but it's good to be early and have a few spare cards on hand, is it?) :)


here's what i made...

holiday scripted christmas card
(stamp set: holiday by jasmine jones)


this is my favourite stamp this month. i am totally in love with jasmine jones's handwritten designs. here, i used the christmas greetings to form a christmas tree. i used different shades of greens to create a ombre effect.

holiday merry christmas card
(stamp set: holiday by jasmine jones) 


a second card made with holiday by jasmine jones. i stamped the christmas tree on a white cardstock, fussy cut out the tree and adhere it on the patterned paper. i used foam dots here to give it some dimension. had some fun decorating my tree with this amazing stamp set! a must have if you are planning to make your christmas cards this year!

party on wow ribbons card
(stamp set: party on)


winter thank you joy card
(stamp set: winter thank you by katie thierjung, redstone embellishment kit)


I tried using old book paper as a background for the stamps here. I painted some white gesso over the old book paper to tone it down so that the stamped images can stand out more. once the white gesso is dried, i stamped the christmas tree in different shades of green, added stars and ribbons on the tree and some presents under them. To finish off, i stamped joy as the greeting, added some gold paint spatters and red sequins. this is such a fun card to make!


baking tag cupcake topper and liner
(stamp set: baking tag by in a creative bubble)


this stamp set by in a creative bubble is so adorable it makes me want to bake something so i could decorate it! i did bake some cupcakes in the end and decided to use the stamp set to make a fun topper and liner for it! for the topper, i stamped on one of the papers from the paper pad and cut a flag and attached to a toothpick. for the liner, i stamped on a white cardstock and made it into a liner.

ok! that's all i have made this month! i must admit that it's way more than what i usually make. i had more time on hand and it's definitely also because the kits are so fun to work it, i just had to make more... i hope you had fun looking through my projects!

thank you for dropping by and happy shopping!

xoxo
lilin

Thursday, 28 May 2015

Galileo Reveal

i'm happy to be contributing to studio calico this month! you will be pleased to know that presales has started for subscribers and all kits will be on sale for everyone tonight at midnight EST/ 11pm CST.

this month, i decided to try something different and worked with the card kit instead! it was lots of fun for me and i am excited to share some cards i made with the main card kit, i do by kelly purkey and hey girl by mama elephant.

here's what i made...

happy birthday card 
(main kit only)


I am inspired by Wilna to use the color theory ink pad to create a background for my card. I just press the ink pad on the card and rub it to create a rectangle background. I then fussy cut the stamped bunny and ice cream and adhere them to the card with foam tabs to create some dimension. next i stamped happy birthday and added some pink paint on the bunny's cheek (though someone mention it looks like ice cream on the bunny and i agree!).


thank you 
(main kit only)


i love colors of the papers in the paper pad so i made a little banner with the different papers. i attached the banners to the twine with my tiny attacher. i also use the tiny attacher to secure the twine to the card. then i added some enamel dots to complete the banner. next, i stamped the thank you phrase in black and pink ink. i then fussy cut and layered them for dimension. to finish off the i added some ink splatters.


alll the happiness in the world
(stamp: i do by kelly purkey)


i created a background with the wedding bands and gold ink. then i fussy cut the stamped bride and groom and adhere them with some foam tabs for some dimension. to add some interest and color to the card, i fussy cut little hearts from one of the patterned papers and adhere it to the card. i love that this stamp set has some sweet phrases which i added inside and and the end the card.


remember! you are the best
(stamp: hey girl by mama elephant)


there are lots of lovely and encouraging phrases on this stamp that i would like to include on my card. so i thought of using the printable labels. i stamped the phrases on some of the labels. then i start to adhere the labels to the card or secure them with my tiny attacher. i also added some of the cute washi tape designed by lizzie mackay (did i mention i am a big big fan of her designs?) and a little bow i made from twine.


happy birthday - i love gelatos
(main kit only)


i am crazy about the bunny and ice cream stamp in the card kit this month so i had to create another card with this cute stamp set. for this card, i  decided to try stamping with gelatos and boy was i happy with the results! i love the watercolor paint effect and i thought it made the ice cream look like gelatos! :) then i started decorating the ice cream with the fruits and enamel dots (i thought they look like candy!). i kept the rest of the card simple and just added the bunny, the happy birthday greeting and some washi tape. 


thats all i have! i hope you enjoyed my little cards. remember to check out the rest of the creative team gallery!

xoxo
lilin

Sunday, 30 November 2014

Studio Calico Announcement + Park Ave Reveal

hello everyone! i'm sorry i'm so so late this month! i have been sick on and off for these 2 weeks so i haven't been online so often these days. lucky for me, ethan is good enough to give his poor mummy a break by sleeping early tonight so here i am! 

first of all, park ave is my last kit for studio calico for this term. for the coming year, i will be a contributor to the creative team. this gives me the flexibility to design only on certain months so i can make way for life and to spent more time with ethan. 

do drop by the studio calico blog to check out the talented ladies who are on the creative team and the list of contributors for the next year!

next, for the park ave reveal... 
this is what i made this month...

a trip home 
(main kit only)


the design of this layout started with me cutting the diamond chipboard into triangles. i wanted to make a layout with all the triangles scattered around. to add more layer, i used a pencil to draw more triangles and color them with watercolors. I also got inspiration from ashley's class to draw some star markings to add interest to the page. for some final touches, i added transparency die cuts, my title and journaling.

so good
(main kit only)


for this layout, my idea was to spilt the page into 2. one side with a pattered paper and simple with a photo of ethan, and the other side with white cardstock and a bit messy with a cluster of embellishments and journaling. with this idea in mind, i selected my favourite patterned paper and adhered it to a piece of white card stock. i didn't want it to be exactly half, so used a 75%-25% rule. most of my embellishments are the transparency die cuts, so to show more layering, i added some watercolors to the white cardstock. 

joyful
(main kit, ritz, helmsley)


 for this layout, created my own version of a christmas wreath. i used paige's digital design as a sewing template and sew the wreath with gold thread. I had lots of fun decorating with all the die cuts from ritz and used it to frame a photo taken last christmas! i kept the rest of this page rather simple and only added a title - joyful to complete the page.

let your light shine
(main kit, ritz, helmsley)


presenting my favourite layout this month! :)
the design for this layout came about when i saw the light bulbs! this page was inspired by wilna! in one of her recent layouts for webster pages, she has these cute little light bulbs hanging from the top of the page with thread. so i lifted this idea and used yellow gelato to add 'light' to the bulbs! next, base on the colors of the die cuts in helmsey, i used painted a rainbow background for my photo with gelatos. then i used the die cuts, sequins, buttons and paper clips to create a banner in front of the photo. i loved how this page turned out and how the focus of the page is still on my black and white photo!

ok, that's all i have today! i hope you enjoyed my pages and if you are interested in finding out more about studio calico's scrapbook kit, click here.

thank you so much for dropping by!

xoxo
lilin 

Wednesday, 29 October 2014

Walden Reveal

hello again! studio calico november kit - walden is now available! love the woody and fall colours in this month's scrapbook kit. the add ons are amazing as well! my favourite kit has to be concord (add on 1)! its packed to the brim with lots and lots of goodies! celine will be using this kit for her upcoming mini book workshop, so if you are taking the class, another reason why you wouldn't want to miss out on this add on! this month, we also have a christmas theme add on - pine hill (add on 2)! love the mix of pretty christmas papers and the lovely washi - i am planning to use this one for my christmas wrapping! and lastly, baker bridge (add on 3) that is full of exclusive items! now let's take a look at what i made this month!


you are my favourite hello
(main kit only)

there is something romantic about the colors in the main kit this month so i made a gift for my cousin using his wedding photo. not my usual colors that says romance but i love the soft colors of grey, peach, green and gold...


for the floral wreath above my photo, i first created a border using the washi tape. i used the walden scrapbook digital stamp to create some die cut flowers and leaves with my silhouette cameo. then i painted the die cuts in coordinating colors to match the washi tape and added the deer and badge as embellishments. i love the brush script hello designed by wilna so i made it into a cut file, paint it with black acrylic paint and used it as my part of my title. and to complete the layout, i added some ink splatters with gold mist and a big round brush. i usually create the ink splatters with the tip of the bottle nozzle but this time with the big round brush, i could see the shimmer of the mist and it's beautiful!!!


a happy day at little big
(main kit only)


i wanted to use all the pretty papers in the kit so i thought a grid design would be best! i used one of the squares for journaling, 2 for photos and the rest, i decorated with embellishments and die cuts. a quick and simple layout to put together. something new i tried with this layout was using a small brush to draw a border to frame the layout. i used gold mist here and used my precision pen to define the border. love how it turned out so i think i will use this technique again!


lucky
(main, concord, baker bridge)


this layout is a gift for my dear friend's wedding! i used gelatos to create a rainbow and layer lots of pretty embellishments over it to create a border above the photo. for added interest, i added some stamp leaves and flowers in coordinating colors. i used color theory ink pads - coral bay, blush crush and something blue. i will be posting a tutorial for this layout soon so keep a lookout for it!


hello lil king
(main kit, concord, pine hill, baker bridge)


this hello stamp designed by wilna is my favourite this month! i stamp the hello in different yummy colours to create a background paper. i used color theory ink pads - sunny day, blush crush, orange country, glass slipper, going green, lime light and clean state. after deciding on the placement of my photo, i added the title - 'lil' using the woodgrain transparent alpha from baker bridge and stitched 'king' on another piece of card stock using the amy tangerine embroidery set.  then i fussy cut each alphabet and adhere it to the layout to add more dimension.

that's all i have! i hope you enjoyed the layouts i made for this reveal! if you are interested in finding out more about studio calico's scrapbook kit, click here.

happy shopping and thank you so much for dropping by!

xoxo
lilin 

Monday, 29 September 2014

The Underground Reveal

hello! i'm back today to share what i made with studio calico october kits from studio calico - the underground.

make magic 
(main kit only) 


another new silk screen in this month's kit! this was my first attempt with silkscreen and i love it! I used the silkscreen with mist here and thought it turned out really well! I'm not good at misting actually, so I used a paintbrush and painted the color over the silkscreen. it's especially fun when you can make so many of them in different colors. i made 3 using mary mary, gold and sea foam. if you have no idea what a silk screen is, it actually works like a mask/ stencil. one side of it is sticky and you stick it down to your cardstock. once it's secure, you can use your favourite media to colour it! some options i can think of are acrylic paint, mist, ink pad and gelatos! there is a video by natalie from the creative team on the sc blog where she shares the different ways you can use the silk screen! click here for the post.

one fine day
(main kit only)


love these leaves cut file by hello forever! i cut them out in the different patterned papers and the old book paper available in the kit. i love using watercolour to paint the background recently and used the technique here. i decided on the colors base on the colors of the patterned paper. i used a blend of red, orange, yellow here. next i scatter the die cut leaves around the page. to add more texture and detail, i hand stitched some of the   leaves and added some cabochons. i love brush script titles, but my handwriting isn't as beautiful as i hope it is... for now (more practice required)! so i cheated by printing the title in manus font in black and fussy cut it. i'm happy with how it turned out! lastly, i fussy cut some hearts in white to add more layers to the page.

happiness = you
(main kit, piccadilly, notting hill)


this is the first time i am using a huge photo for my layout. i printed my photo on a piece of 8.5 x 11 vellum and i love how it turned out, especially after i layered the photo over a patterned paper so that the colors shows through. i wanted the huge photo to be the focus of this page, so i kept the embellishing. i used the beautiful stamp in piccadilly and stamped the design in black on white card stock. then i fussy cut the stamped flowers so that they can be used as embellishments together with some stickers and badge. another favourite of mine this month are the pastel wood drop stickers!

go see do
(main kit, piccadilly, notting hill, king's cross)


love these beautiful crate paper frames and how they can be used to create a simple grid design. to add interest to the page, i painted a background with watercolors as a base for my frames. to decide on what colors to use, i turned to the beautiful rub ons included in king's cross. i would never have thought of matching the colors grey, yellow and purple but when i saw the rub ons, i thought the color combination is perfect. what's better is that there are frames in the pack that fits into this color scheme. after i painted the background, this page came together easily as i added matching frames and embellishments to each grid. 


i hope you enjoyed the layouts i made for this reveal! if you are interested in finding out more about studio calico's scrapbook kit, click here.

thank you so much for dropping by!

xoxo
lilin