Friday, 30 May 2014

Mini Book Mini Workshop At Studio Calico - Maggie Holmes

hi! i'm back to share some information on the latest class for the mini book mini workshop series at studio calico. for this latest instalment, we have a class taught by talented maggie holmes!


in this class, you will learn how to create your own diy album with a mixture of different page bases including chipboard, page protectors, old book paper, envelopes and more. if you love maggie's scrapbook style and her beautiful mini albums, you will not want to miss this class!

check out some of the sneaks of her beautiful album!


and some of the pretty albums from the class participants!


here are some of the digital extras you will be getting when you sign up for these class.


registration closes very soon on 31/5/2014 11:59 pm est, so now is your last chance to sign up! for more details and to sign up, click here

hope to see you in class!

Lilin

Wednesday, 28 May 2014

Hello Hello Reveal

it's here! studio calico june kits - hello hello are here! i can't tell you how much i enjoyed working with the kits this month! i am happy to work with the main scrapbook kit, hola (add on 1), ni hao (add on 2) and bonjour (add on 3). 

filled with pretty papers, foam stamps, acrylic paint, colorful gems, gold labels, acetate alpha and lots more, what's not to love about the main scrapbook kit???!!! it's my absolute favourite this month!

let's take a look at what i made!

five
(main kit only)


i will be celebrating my fifth wedding anniversary this june so i created this page just to remember this special day. i am very much in love with origami now. i love how a square piece of paper can be folded into so many pretty shapes. this layout is inspired by an image i saw on pinterest on origami hearts. using the color scheme of the gems in the kit, i trim 5 patterned papers into squares and folded them into little hearts. next i used some watercolors and create a subtle rainbow background. i layer my photo with vellum and place it on the rainbow and arranged the origami hearts to match the rainbow background. i kept my embellishments simple and added some die cut leaves by life love paper, gems, a gold label and the title. 

us
(main kit only)


i had lots of fun playing with the foam stamps for this layout. i applied some gelatos on the stamp, blend it with a wet brush and stamp. love how soft and subtle the stamp images turn out. to make the photo stand out from the white card stock, i used yellow gelato to colour subtle background. next i layer my photo with a small piece of vellum and a die cut frame by in a creative bubble. i finished the page by adding my title, die cut leaves, some stickers, gold label for my journaling and date stamp. the card stock buckled a bit here so i stick it on a piece of patterned paper to stretch it out.

be happy . be bright . be you
(main kit, halo, ni hao, bonjour)


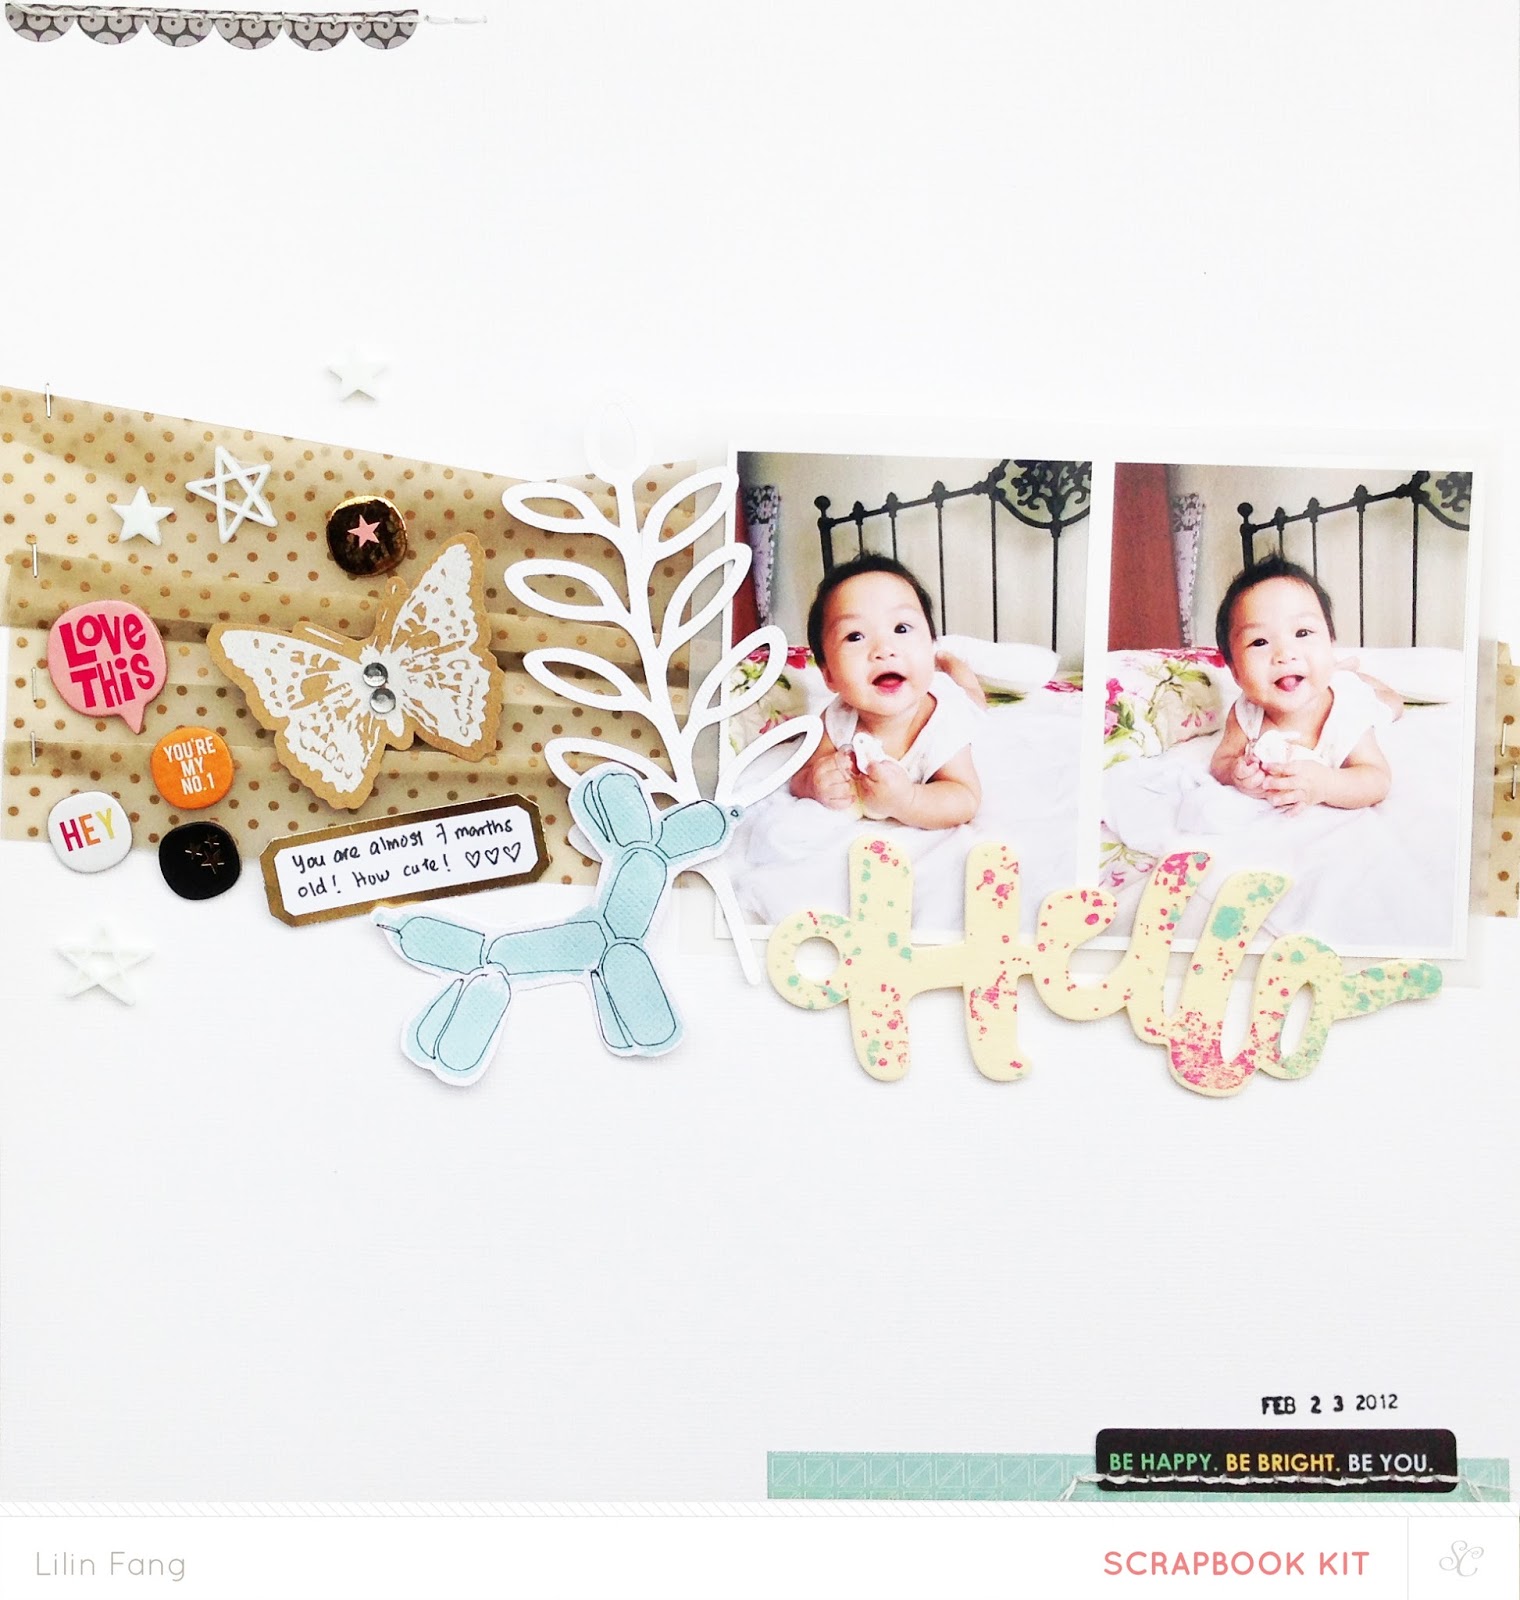
i am inspired by one of wilna furstenburg's layout where she used folded vellum. So for this layout, i folded the gold vellum paper in ni hao to create a layered background. after deciding where to place my photo, i added bits and pieces of embellishments from bonjour and my favourite die cut leaves (i cut a bunch of them using my silhouette cameo beforehand). 

i love the little balloon dog stencil in bonjour and wanted to add it to my page. i used the mr huey's dauber from last month's kit and coloured the stencil on a small piece of card stock. after colouring, the shape wasn't very clear so i placed the stencil on again and drew the outline with my pen. next i fussy cut the balloon dog and stick it on my page as an embellishment. 

at this point, i thought the top and bottom part of my page looked a bit plain so i added some stickers and some hand stitching for added interest.

daddy's boy
(main kit, hola, ni hao, bonjour)


for this layout, i used this cut file designed by paige evans as a stencil. i used my silhouette cameo to cut the design on a piece of paper (you could use transparency if you would like to reuse the stencil). next, i place the stencil on a piece of white card stock and applied some gel medium + gesso mixture. gel medium is opaque so adding some gesso will make it white. after removing the stencil, i am left with a tone on tone textured background which i love!

when i first saw the heart shaped digital stamp designed by in a creative bubble, i thought it will be fun to use it as a stitching stencil. i printed the digital stamp on a piece of paper and used it as a stencil. after stitching the design, i fussy cut the heart and used it as an embellishment for this page.

after deciding the placement for my photo, i arranged my embellishments and title. to add more color and more of a mixed media feel to the page, i used mr huey's mist in seafoam, mary mary and inky black to create ink splatters. lastly, i finished the page with stamps included hola and my date stamp. 

i hope you have enjoyed my reveal of hello hello! if you love studio calico kits and would like to subscribe, click here and start your subscription with camelot!

happy shopping and see you soon!

lilin

Monday, 26 May 2014

Hello Hello Sneaks

hello hello! i'm so excited to share my sneaks for studio calico june kits - hello hello! this happens every month but i got to say that june's kits is amazing! one of my favourites so far! love the cute names too! here's the mood board...


love that this month's kits are filled with my favourite colors - mint green, yellow and pink! 

here's some sneaks of what i made...


this is a main kit only layout. i used some watercolors to add splashes of paint to a white card stock and used the patterned paper in the kit to fold these origami hearts. i will be preparing a tutorial for these hearts so do keep a lookout for it!


this is another main kit only layout. the main kit comes with a set of awesome foam stamps! this is the first time i played with foam stamps and i love them. used the stamps with gelatos and they work perfect together.


for this layout, i used the main kit and all 3 add ons - hola, ni hao and bonjour. a cute balloon dog stencil is included in add on 3 - bonjour! i used it with some mist and love how it looks after i drew the outline of the little dog. 


i used a mix of main kit plus all 3 add ons for this layout. i used gel medium + gesso + a exclusive cut file designed by paige evans to create a tone on tone textured background here. i was happy to get a bit messy with this layout and i can't wait to show it to you.

i  hope you enjoyed my sneaks and if you would like to see what other goodies you will be able to find in this month's kits, you can check out the confirmed thread on studio calico message board here

see the full reveal on 27th at noon EST/ 11am CST for subscribers and  27th at midnight EST/ 11pm CST for non subscribers.

thanks for dropping by and see you at reveal!

lilin

Monday, 12 May 2014

Elle's Studio May Inspiration Gallery

elle's studio exclusive may kit and inspiration gallery is now live! here's a look at the may kit! as always, i love the colors of the kit this month! love the combination of red, pink, yellow, green and some navy blue!


you can purchase these lovely kits from shop now!

you will also be pleased to know that coordinating stamp, wood veneers and cut files also available!


and for this month, a patriotic mini collection where you can find tags, stamps and wood veneers is also available! 

here's a look at what i made this month!

happy happy!


love this happy card and the star stamps from this month's exclusive! hence, i used stars as the main element of this page. i picked out the red star banner from may's kit and a circle tag from everyday moments collection. i also added some watercolor stars which i painted with mister huey's mist and watercolor set.
i'm in love with paper bows now, so i used a patterned paper from everyday moments collection to make this origami bow and used it to embellish my page. to add more interest to the page, i also hand stitched the white stars at the bottom of the page.

a lazy day


i love transparencies so i'm thrilled to find it in this month's exclusive kit. I used the 'a lazy day' transparency as an overlay for my photo and as my title for this layout. i created a grid using pieces from the kit, pieces i cut from "today's photos" paper from everyday moments collection and squares i painted using watercolors. the fun of creating this layout is i get to decorate each square. i am inspired by stitched class i attended at studio calico so i added lots of hand stitching here. i also added some tags, wood veneer, stamps and journaling for the rest of the squares. 

you're the best!


this card is inspired by this mood board i found on pinterest where paper bows are hang on some twine using clothespin. 


i made some origami paper bows with papers from Love You More collection and created this mother's day card.  since my choice of papers are grey and white, the ribbons didn't stand out from the white card. so i added this bright yellow die cut from dear lizzy as a base. love how it instantly makes the ribbons pop! i also added a hand drawn border to soften the edges of the card. the wood veneer is from this month's exclusive add on! i love gold, so i colored it with my trusty gold leafing pen. since the bows are quite dimensional, i was afraid i would crush the bows if i place the card in a envelope, so i recycled a glassine bag i had lying around and tied some twine around it.

  
that's all i have today. i hope you enjoyed these projects i created for elle's studio may inspiration gallery. to see more pictures of my layouts and card as well as the list of products used, visit my gallery here... do check out projects by the rest of the talented design team too!

have a great week ahead and see you soon!

lilin

Thursday, 8 May 2014

A Closer Look - I Adore You


hi! i'm here to share a quick tutorial of this layout i made with studio calico camelot main scrapbook kit. this layout is inspired by this exclusive scallop dot cut file designed by paige evans and the new set of gelatos i bought.


i used my silhouette cameo to cut the scallop dot file in 6 x 8 inch and will be used as my stencil. to create some texture, i used gel medium. however, gel medium is transulcent so i mixed in some gesso to give it a opaque look. i place the stencil on my white cardstock and applied the gel medium + gesso mixture. 


since i wanted the scallop dots to appear over my 12 x 12 inch paper, i had to overlap the stencil which is not a very good idea as some of the gel medium smudge when i did that. i would suggest to either  wait for the gel medium to dry before overlapping the stencil or cut the stencil in 12 x 12 inch. 


after the gel medium has dried completely (i left mine overnight), i applied a rainbow of gelatos over the scallop dots. then i blended the gelatos with water and a brush. as i am applying the water on the gelatos, i allowed the water to drip and flow to the sides of the paper. another point to note here is i should have allowed one color to dry completely before blending the next. i didn't, so there were some mixing of colours :P


here's how it looks like after blending the gelatos and letting it dry. love how the gel medium resist the paint and how the dots shows. 


after playing with the placement of the photo, i decided to turn the page around. i choose to place the photo near the blue paint to match ethan's blue shirt. i layered a piece of vellum below my photo to add some dimension. i die cut one of the digital stamp designs by suzy plantamura - i adore you and used it as my title.


next, i used the patterned papers in the kit to fussy cut some hearts. i place them on the page according to the color of the paint. since i don't have any gold papers, i fussy cut the heart from white cardstock and colored it gold using my gold leafing pen. 


i also added the hello and hearts from dear lizzy gold rub ons and some gold enamel dots. i place them where the gold paint is.
to finish off the page, i added my journaling and adhered the page on a piece of yellow patterned paper.

and there you have it! i hope you enjoyed this tutorial!

if you want to find out more about studio calico kits, you would be happy to know there is a promotion going on now! so this means you can start a subscription now with the camelot kit and cancel anytime with no cancellation fee. 


click on the following to start a subscription for:

on the page, click on start a subscription to add the kit to your shopping cart and remember to use promo code: NORISK14

thanks for dropping by and see you soon!

Sunday, 4 May 2014

Studio Calico NSD - Color Challenge

hello! i hope you had lots of fun scrapping during nsd last weekend. my in laws were in town over the labor day holidays and we were busy spending time together so i didn't have a chance to scrap. i did, however, manage to come up with a layout for a color challenge at studio calico before that. 


this is the mood board used for this challenge and here's what i made...


i absolutely love this mood board and am happy to be working on this color challenge! the image of the paints on the board inspired me to add mixed media into this page, so base on the colors on the board, i picked out the gelatos to create a background with the sweet nothings stencil by Teresa Collins. 

i colored the hearts with gelatos then i added water to blend them. There is no mint green in the set, so i blend the color using green, yellow and white gelatos. love how easy is it to blend you own colors and how it turned out! then I cut out 3 frames from the dear lizzy fascinating friends paper and colored them with gelatos to match the background. i attached the frames to a twine using wooden clothespin, flag pin and a green maggie holmes resin flower pin. 

next, i embellish the page with stickers, sequins, vellum shapes, a rose die cut, and rub ons. i love the scripted writing on the mood board so i wanted to add my title in a similar way. i dipped my brush into mr huey’s navy blue mist and wrote my title – I heart you. to balance the page, i added more ink splatters at the top left hand corner with mr huey’s gold and seafoam mist. 

here are some detailed shots...


i’m happy how this mood board has inspired me to create this layout. i would love for you to join me in this color challenge and create a project with this pretty mood board too!

 to be entered to win a prize from the calico closet, please post your project in the studio calico gallery by may 11th and add the tag #nsd1 in the description.

if you would like to see the full list of products used, click here.

have lots of fun!